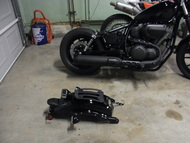
After analysis of the respective wiring diagrams, I did the install of a Yamaha XVS950 V-Star Multi-Function Meter on a Yamaha XVS95CE "Bolt"...
[Still needs to be fixed or if found not to be feasible, noted as such]
Basically, I knew that it would work with the exception of the point at which the Fuel Low Level LED would come ON/OFF, since the Resistive values from the respective Fuel Senders is slightly different...but unlike what I thought was going to be a quick and easy fix, is turning out to be quite a challenge...
Just putting in a parallel resistor with the Fuel Sender's 1900 to 1350 ohms resistance, in order to have a resistive window closer to the XVS950 V-Star's window of 1720 to 830 ohms, so as to have a point where 1008.0 ohms is present, near the desired 20% to 23% "Low Fuel" point, is not working as anticipated and I have not been able to get the "Low Fuel" LED to come ON...
It does come ON, if I connect a potentiometer and crank it down to near ZERO, the LED does come ON...on the XVS95 "Bolt", the "Low Fuel" LED does come ON, at the 1476.5 ohms which is the 23% reserve fuel point, using the same potentiometer...so it seems that the XVS950 V-Star's Meter, has a different circuit and I may need to open it up to investigate further and compare it to the XVS95 "Bolt" Meter...
I did more extensive testing on this Bolt as well as helping another member in Europe with his Motogadget Analog Meter install on his Bolt and after doing numerous tests and even making several circuits and testing them on the bike, it is definite that either the thermistor inside of the gas tank needs to be replaced with one needed for the meter to be installed or a totally new, resistive "sensing" circuit be made and installed in order to get the Fuel Low Level circuitry to work...so on my Bolt, I just decided to use the Odometer/Trip Meters to keep an eye on when I needed to Fuel up...
The Speedometer, Odometer and Trip Meters, work just like the OEM Meter for the Bolt (with the same error offset), as the Speed Sensor Voltages are the same on both bikes...
The Oil Level LED circuitry works, since the resistive values for both bikes are the same...
Also, wanted to see if the DIAG mode would work as it does on the XVS950 V-Star...it does NOT...as verified by getting a ER-4 error which is telling me that the correct "K2" signal requested is not being returned from the ECU...
Changing ECU to a XVS950 V-Star ECU, would take of that problem but don't know all the effects of the AFR Mapping, Timing, etc, etc... programmed into the ECU and that may not be a viable solution...
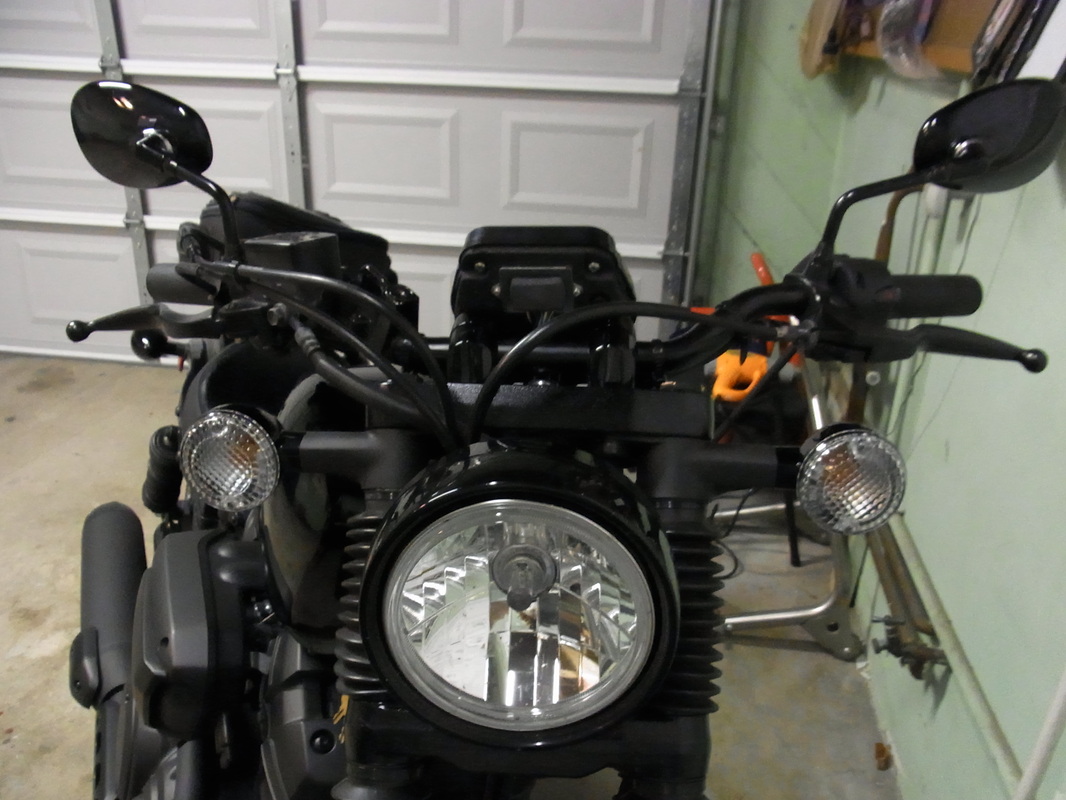
But the meter works great and the initial goal was to have a functioning "Analog" Speedometer, versus the "piece of crap" LCD Smokey Plexiglass Meter that Yamaha installed on the Bolt...
Someone in Yamaha Engineering didn't do their homework...it's suppose to be "OLD SCHOOL"....they didn't have LCDs or LEDs, back in those days...duhhhhhh...
So, I made a video of the testing as best as I could considering that I don't own a "Go-Pro" to mount on a head band and I didn't have anyone around to help me....but you'll get the idea of what's what...just take a look at the video below (it is also in the Videos Section of this site)...
The Oil Level LED circuitry works, since the resistive values for both bikes are the same...
Also, wanted to see if the DIAG mode would work as it does on the XVS950 V-Star...it does NOT...as verified by getting a ER-4 error which is telling me that the correct "K2" signal requested is not being returned from the ECU...
Changing ECU to a XVS950 V-Star ECU, would take of that problem but don't know all the effects of the AFR Mapping, Timing, etc, etc... programmed into the ECU and that may not be a viable solution...
But the meter works great and the initial goal was to have a functioning "Analog" Speedometer, versus the "piece of crap" LCD Smokey Plexiglass Meter that Yamaha installed on the Bolt...
Someone in Yamaha Engineering didn't do their homework...it's suppose to be "OLD SCHOOL"....they didn't have LCDs or LEDs, back in those days...duhhhhhh...
So, I made a video of the testing as best as I could considering that I don't own a "Go-Pro" to mount on a head band and I didn't have anyone around to help me....but you'll get the idea of what's what...just take a look at the video below (it is also in the Videos Section of this site)...
I start out with the Power ON, meter initiation sequence, which is "normal" Yamaha convention for their Analog Meters, where the needle goes from ZERO to Max Speed and then back to ZERO...as well as all of the LEDs coming ON and then only the ones that should be ON, stay ON...(ie, Neutral LED)...
Next, I show the Speedometer working...just have patience as I first had it in 1st gear and I had to put the camera down to shift into 5th...
Then I let it "rip" all the way to close to the max of 130 MPH...a few repetitions for good measure...
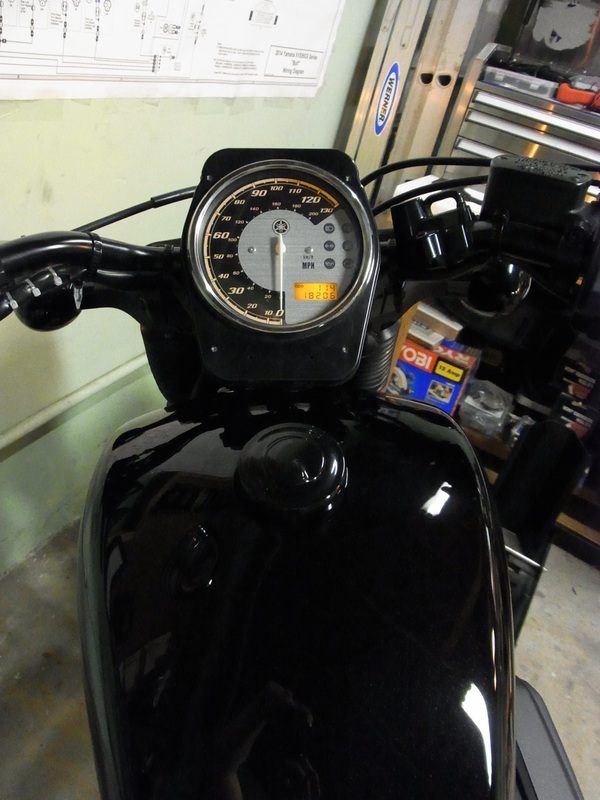
Next, you will see the Odometer click over from 18205 to 18206 miles at approx. 2:28 minutes into the video, verifying that it works...
Next, adjusting the Clock...no biggie...
Then, I had to put the camera down again, as I had to turn the ignition OFF, hold the SELECT button down as I turned ON the ignition...in order to get into the "Meter Brilliance" adjust mode...a little bit of jumping around to turn the lights OFF in the garage and then you can see the brilliance, clearly changing from "1" circle (Min) to what was it, "6" circles (Max)...
Next, I started the engine to show that the "Passing" switch does in fact make the "High Beam" LED come ON/OFF in unison with my switch button pushes...as well of course as the "High Beam" switch working on the LED...
Than, I verified that the Turn Signal LED works with both the turn signal switch as well as the Hazards switch...
JFI...I soldered in the two connectors for the XVS950 Meter in parallel with the OEM connector, so that I can use either meter...
I played around with a few different "Logo" plates on the lower section of the Meter and at the end, I settled on the Yamaha Tuning Fork Logo Plate...it makes the assembly look, OEM, on the Bolt...
I like this Analog Speedometer modification...
Anyways...life goes on...
Next, I show the Speedometer working...just have patience as I first had it in 1st gear and I had to put the camera down to shift into 5th...
Then I let it "rip" all the way to close to the max of 130 MPH...a few repetitions for good measure...
Next, you will see the Odometer click over from 18205 to 18206 miles at approx. 2:28 minutes into the video, verifying that it works...
Next, adjusting the Clock...no biggie...
Then, I had to put the camera down again, as I had to turn the ignition OFF, hold the SELECT button down as I turned ON the ignition...in order to get into the "Meter Brilliance" adjust mode...a little bit of jumping around to turn the lights OFF in the garage and then you can see the brilliance, clearly changing from "1" circle (Min) to what was it, "6" circles (Max)...
Next, I started the engine to show that the "Passing" switch does in fact make the "High Beam" LED come ON/OFF in unison with my switch button pushes...as well of course as the "High Beam" switch working on the LED...
Than, I verified that the Turn Signal LED works with both the turn signal switch as well as the Hazards switch...
JFI...I soldered in the two connectors for the XVS950 Meter in parallel with the OEM connector, so that I can use either meter...
I played around with a few different "Logo" plates on the lower section of the Meter and at the end, I settled on the Yamaha Tuning Fork Logo Plate...it makes the assembly look, OEM, on the Bolt...
I like this Analog Speedometer modification...
Anyways...life goes on...
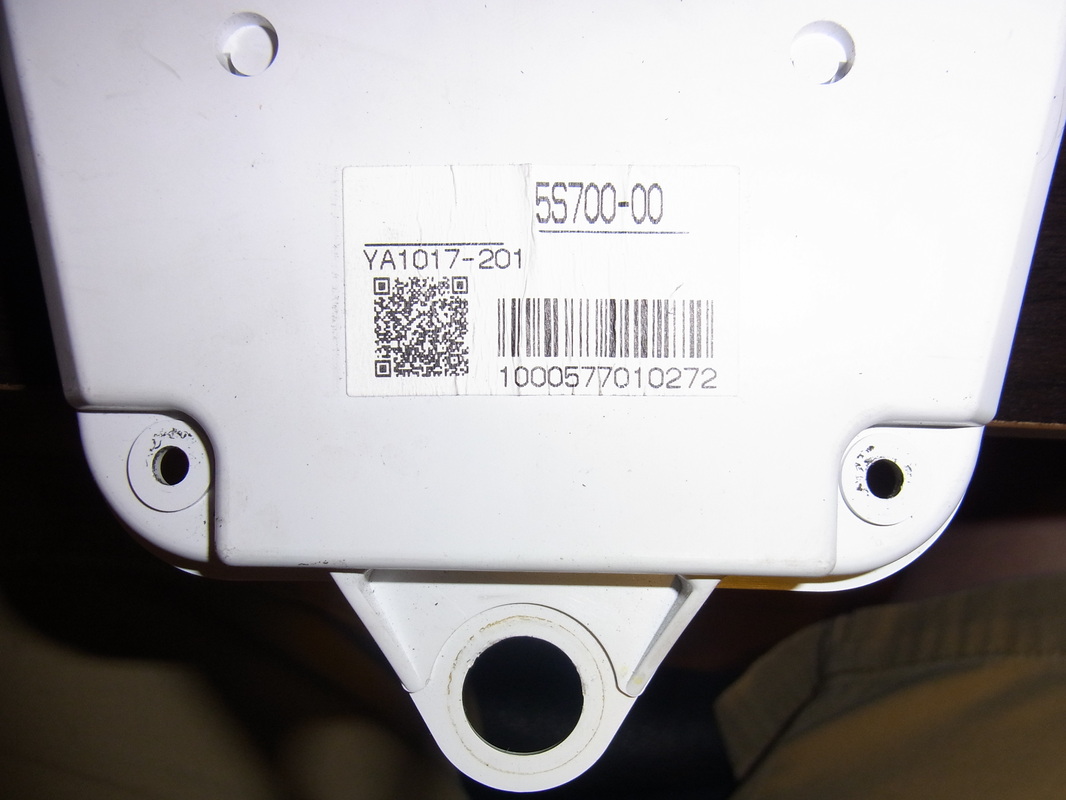
Bar Code data sticker on XVS950 V-Star Meter
|
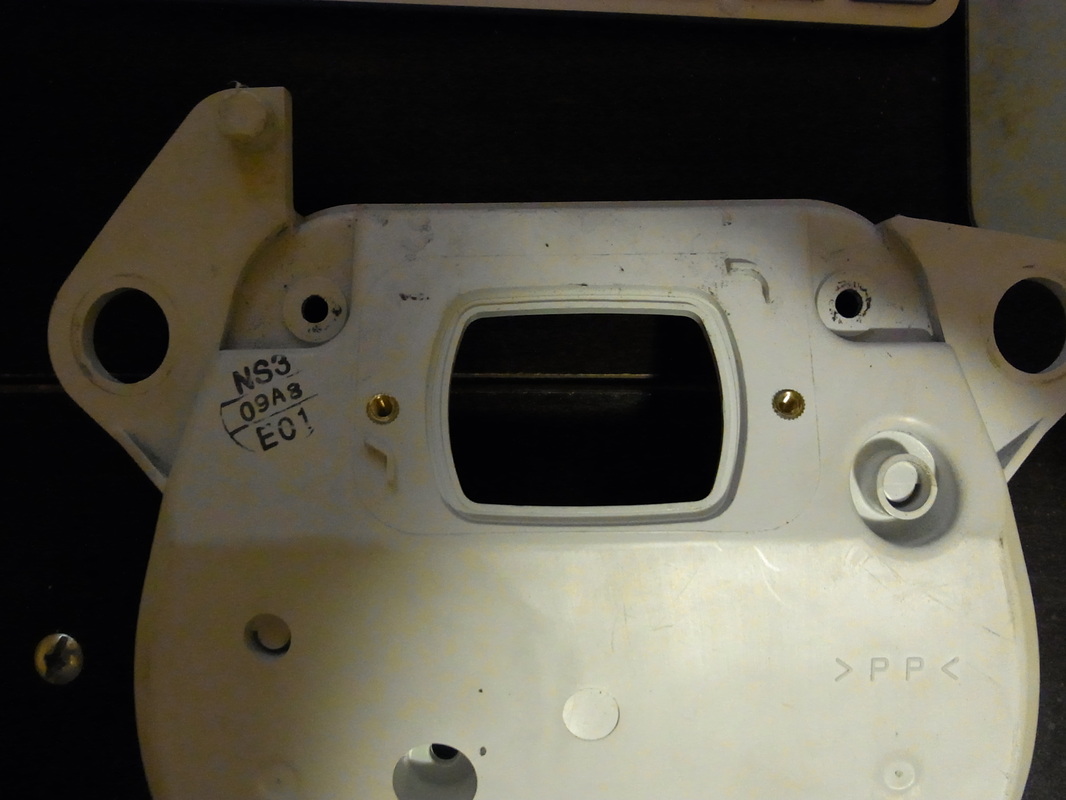
QA Stamp on
XVS950 V-Star Meter |
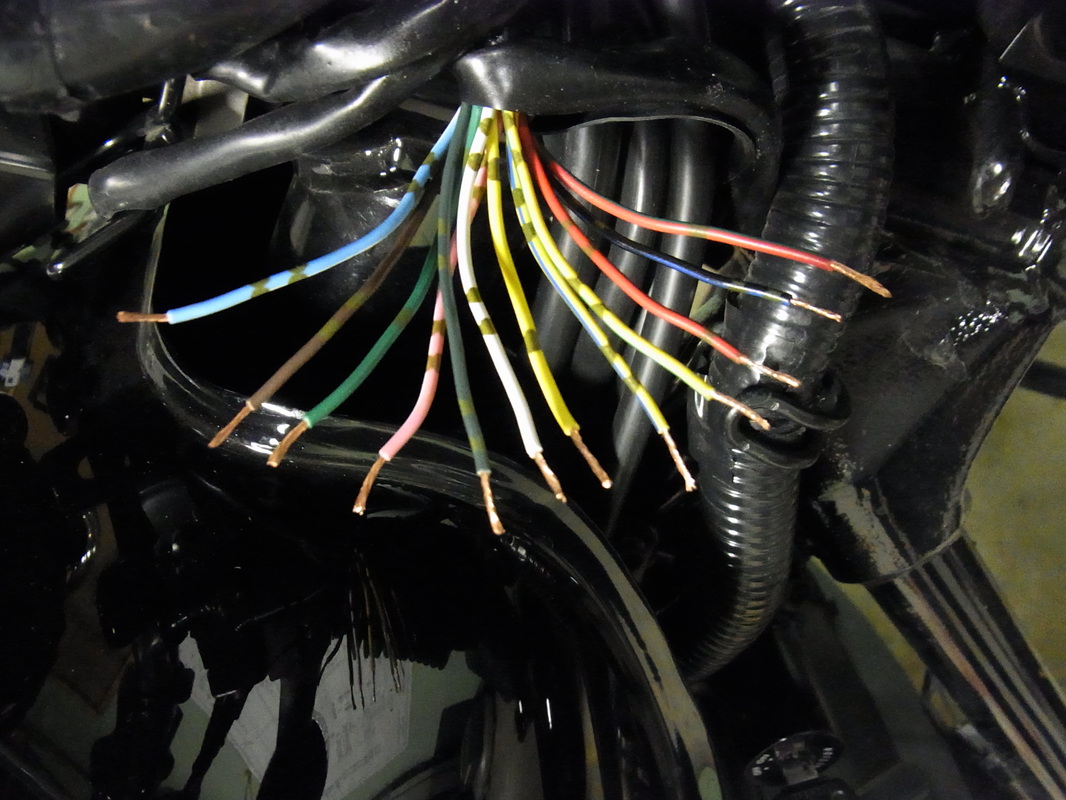
OEM Cable Harness side wires "prep'ed" for soldering
|

XVS950 V-Star Couplers/Cable Harness "prep'ed" for soldering
|
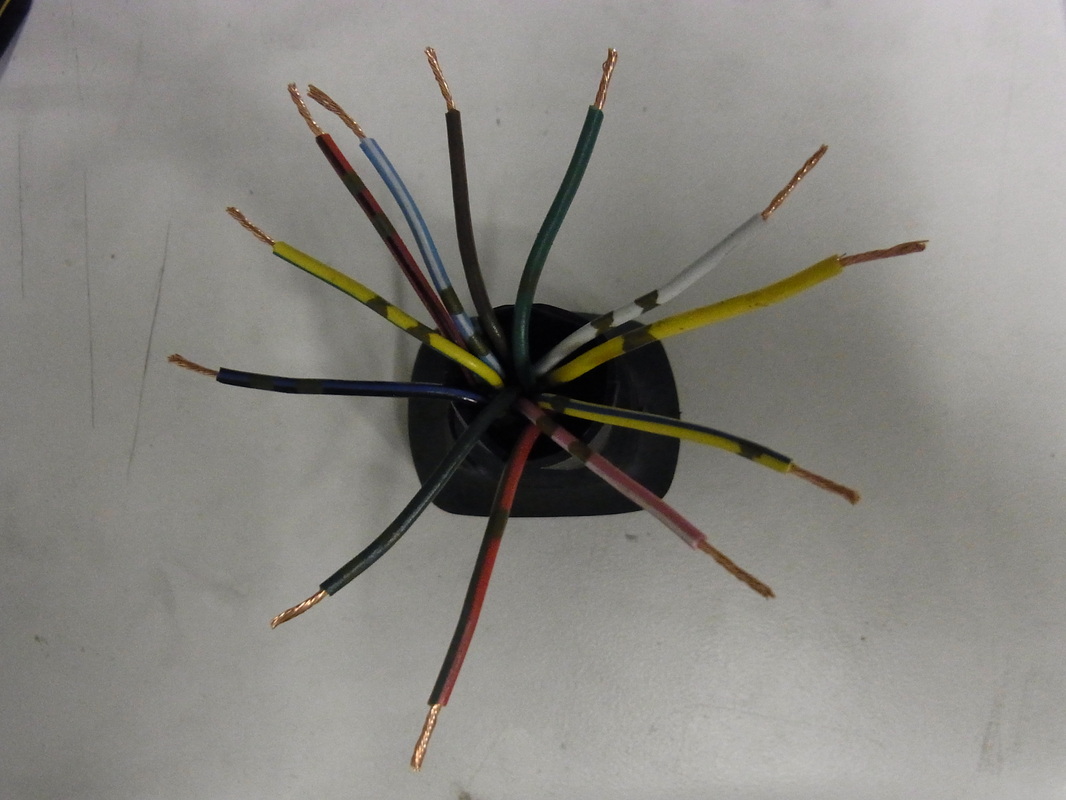
OEM Coupler/Cable Harness "prep'ed" for soldering
|
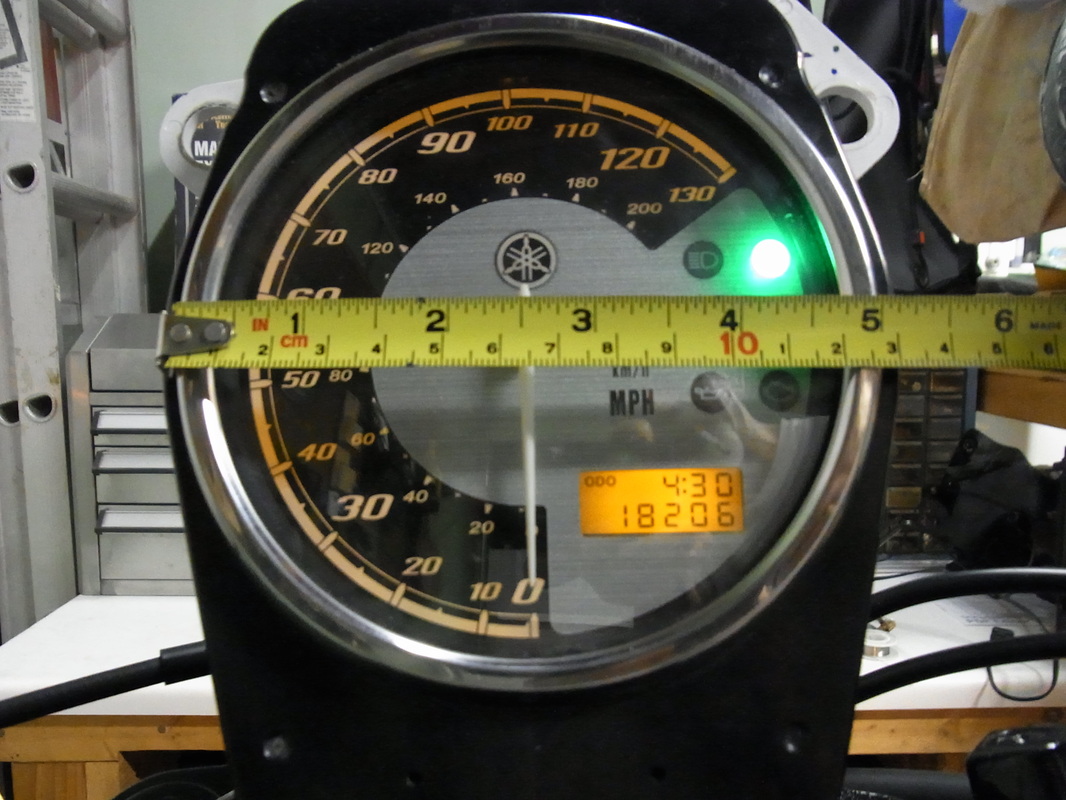
XVS950 V-Star Meter Cross Dimension
|

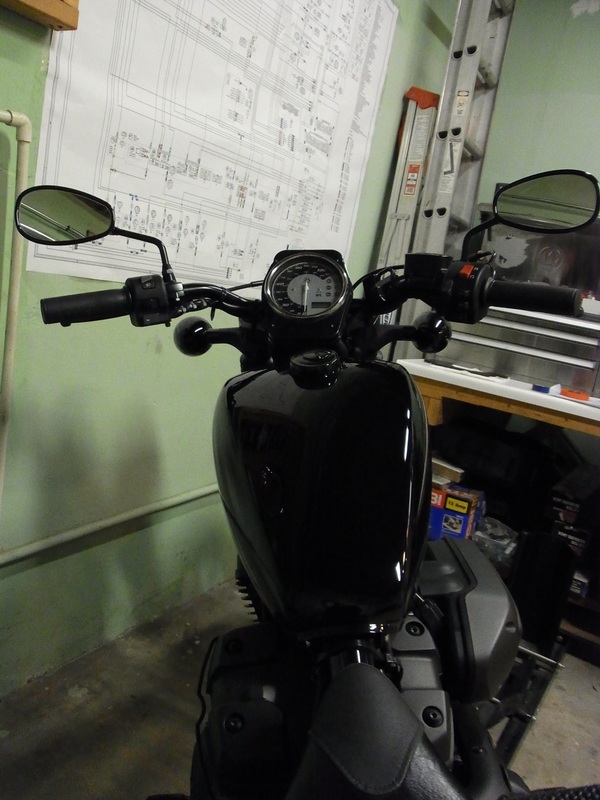
XVS950 V-Star (Top) and OEM Meter (Bottom) Comparison View (w/No Windscreen
|
XVS950 V-Star (Top) and OEM Meter (Bottom) Comparison View (with Windscreen
|
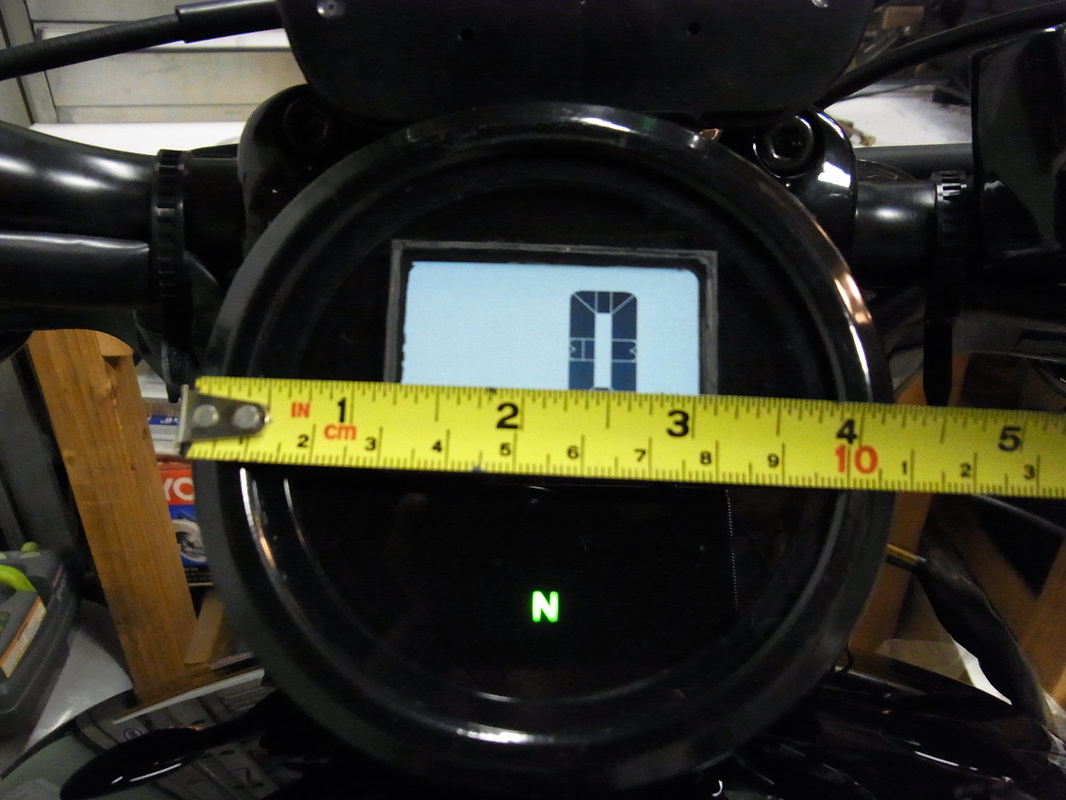
OEM Meter Cross Dimension
|

Installed XVS950 V-Star Meter with "YAMAHA" Black on Gold, Logo Plate
|
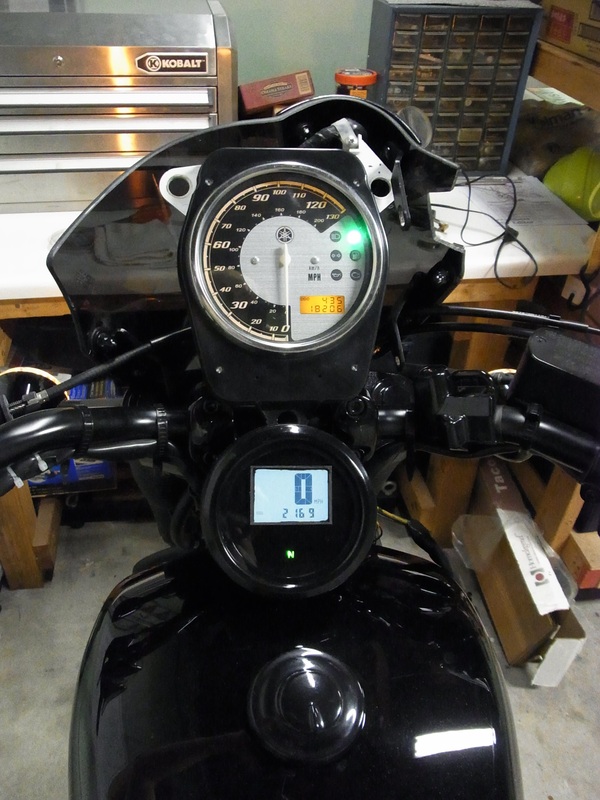
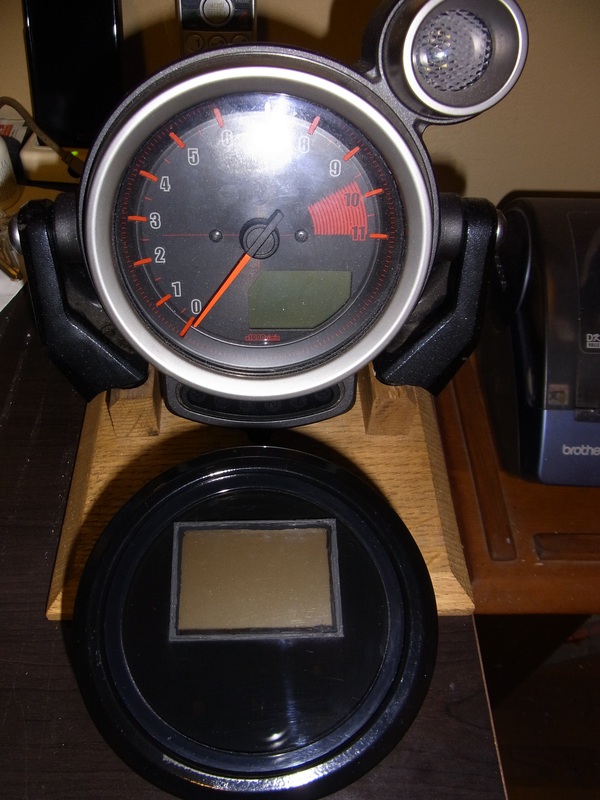
Installed XVS950 V-Star Meter with nothing on lower section of Assy
|

Another view angle of installed XVS950 V-Star Meter with nothing on lower section of Assy
|
Another view angle of installed XVS950 V-Star Meter with nothing on lower section of Assy
|
Another view angle of installed XVS950 V-Star Meter
|
Addition to my Meter Archive...lol
|
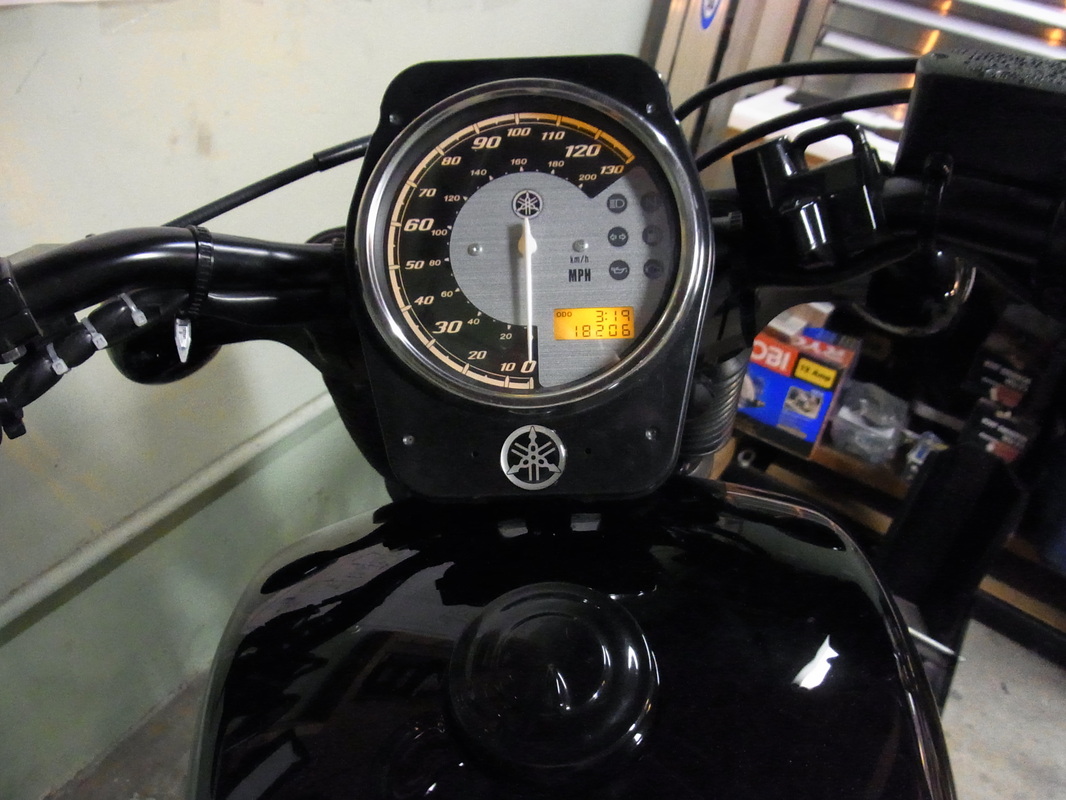
Final installed XVS950 V-Star Meter with Yamaha "Tuning Fork" Logo Plate
|

Another view angle of final installed XVS950 V-Star Meter with Yamaha "Tuning Fork" Logo Plate
|

|
Fuel Sender Calcs for "Low Fuel" LED function.
I made this in order to understand what the thermistors were doing inside of the gas tank. 
|
|
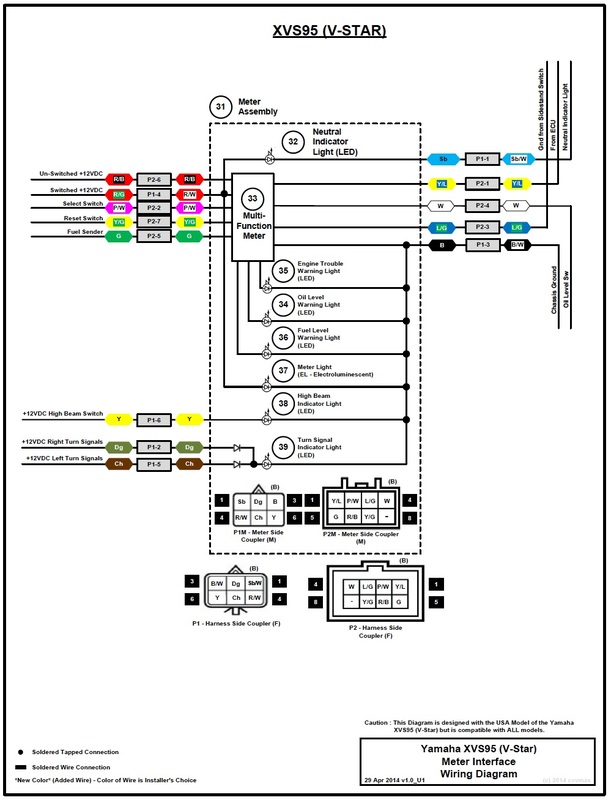
XVS950 "V-Star" Meter Wiring Diagram 
|
|
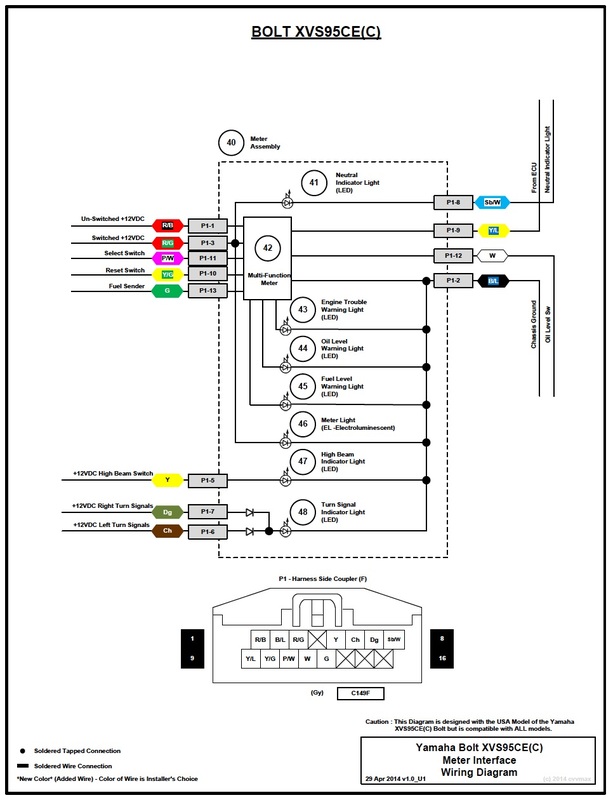
XVS95CE OEM Meter Wiring Diagram

|
© 2013-15 cvvmax. No animals, HDs or Ducatis were harmed in the making of this site.