|
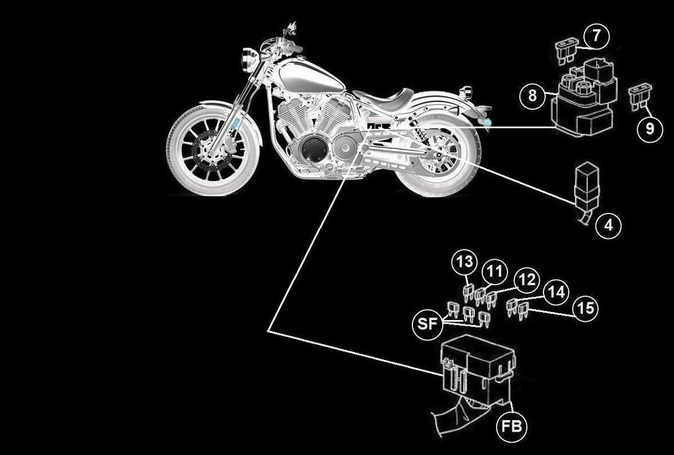
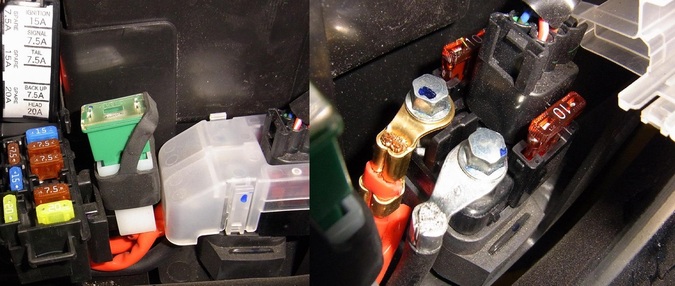
4. Main Fuse (40A)
7. Fuel Injection System Fuse (10A) (Part of - 8. Starter Relay) 9. Spare Fuse (10A) 11. Signaling System Fuse (7.5A) 12. Taillight/Brake Light Fuse (7.5A) |
13. Ignition Fuse (15A)
14. Backup Fuse (7.5A) 15. Headlight Fuse (20A) SF. Spare Fuses (7.5A, 15A, 20A) FB. Fuse Box |
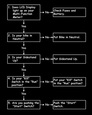
CHECKING THE FUSES
The following procedure applies to all of the fuses.
< NOTICE >
To avoid a short circuit, always set the Main Switch to "OFF" when checking or replacing a fuse.
1. Set the Main Switch to "OFF".
2. Remove:
• Left Side Cover
• Tool Box
3. Check:
• Fuse
a. Remove the fuse to be tested, from its mounting location.
b. Using a Ohmmeter, measure the resistance (continuity) of the fuse.
< TIP >
Set the Ohmmeter selector to "R x 1".
c. If the Ohmmeter does not indicate a near short and indicates "Infinite", replace the fuse.
4. Replace:
• Blown (bad) fuse
a. Install a new fuse of the correct physical size and same amperage rating as the one being replaced.
b. Test by turning the Main Switch, "ON" and operating the applicable switch(es) to verify that it has
corrected the problem.
c. If the fuse immediately blows again, check the electrical circuitry for that particular fuse.
< WARNING >
Never use a fuse with an amperage rating other than that specified. Improvising or using a fuse with
the wrong amperage rating may cause extensive damage to the electrical system, cause the lighting
and ignition systems to malfunction and could possibly cause a fire.
5. Install:
• Tool box
• Left side cover

© 2013-15 cvvmax. No animals, HDs or Ducatis were harmed in the making of this site.