CHECKING THE SPARK PLUGS
The following procedure applies to all of the spark plugs.
1. Remove:
• Rear cylinder right cover
2. Disconnect:
• Spark plug cap
3. Remove:
• Spark plug
The following procedure applies to all of the spark plugs.
1. Remove:
• Rear cylinder right cover
2. Disconnect:
• Spark plug cap
3. Remove:
• Spark plug

Before removing the spark plugs, blow away any dirt accumulated in the spark plug wells with compressed air to prevent it from falling into the cylinders.
4. Check:
• Spark plug type
If incorrect -> Change.
• Spark plug type
If incorrect -> Change.

|
Manufacturer / Model
NGK / CPR7EA-9 |
5. Check:
• Electrode
If damaged/worn -> Replace the spark plug.
• Insulator
If Color is Abnormal -> Replace the spark plug.
Normal color is medium-to-light tan.
6. Clean:
• Spark plug (with a spark plug cleaner or wire brush)
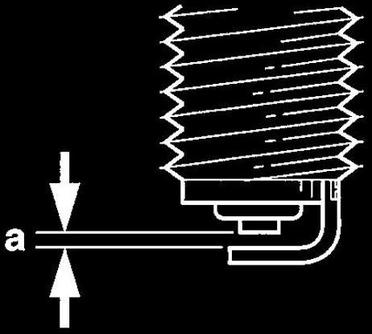
7. Measure:
• Spark plug gap "a" (with a wire thickness gauge)
If out of specification -> Regap.
• Electrode
If damaged/worn -> Replace the spark plug.
• Insulator
If Color is Abnormal -> Replace the spark plug.
Normal color is medium-to-light tan.
6. Clean:
• Spark plug (with a spark plug cleaner or wire brush)
7. Measure:
• Spark plug gap "a" (with a wire thickness gauge)
If out of specification -> Regap.

|
Spark plug gap
0.8-0.9 mm (0.031-0.035 in) |
8. Install:
• Spark plug
• Spark plug

|
Spark plug
13 Nm (1.3 m-kgf, 9.4 ft-lbf) |

Before installing the spark plug, clean the spark plug and gasket surface.
9. Connect:
• Spark plug cap
10.lnstall:
• Rear cylinder right cover
9. Connect:
• Spark plug cap
10.lnstall:
• Rear cylinder right cover
CHECKING THE IGNITION SPARK GAP
1. Check:
• Ignition spark gap
If out of specification -> Perform the ignition system troubleshooting.
1. Check:
• Ignition spark gap
If out of specification -> Perform the ignition system troubleshooting.

|
Minimum ignition spark gap
6.0 mm (0.24 in) |

If the ignition spark gap is within specification, the ignition system circuit is operating normally.
a. Disconnect the spark plug cap from the spark plug.
b. Connect the ignition checker "1" as shown.
a. Disconnect the spark plug cap from the spark plug.
b. Connect the ignition checker "1" as shown.

|
Ignition checker
90890-06754 Oppama pet-4000 spark checker YM-34487 |
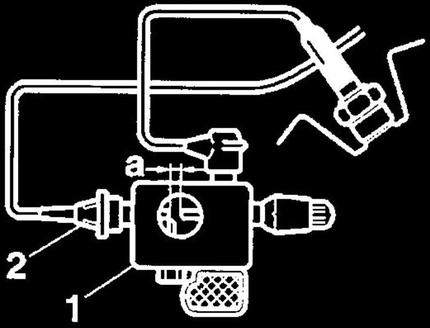
2. Spark plug cap
c. Turn the main switch to "ON" and set the engine stop switch to "RUN".
d. Measure the ignition spark gap "a".
e. Crank the engine by pushing the start switch and gradually increase the spark gap until a misfire
occurs.
c. Turn the main switch to "ON" and set the engine stop switch to "RUN".
d. Measure the ignition spark gap "a".
e. Crank the engine by pushing the start switch and gradually increase the spark gap until a misfire
occurs.
CHECKING THE SPARK PLUG CAPS
The following procedure applies to all of the spark plug caps.
1. Check:
• Spark plug cap resistance
If out of specification -> Replace.
The following procedure applies to all of the spark plug caps.
1. Check:
• Spark plug cap resistance
If out of specification -> Replace.
|
Resistance
7.5 - 12.5 Kohms |
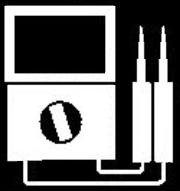
a. Remove the spark plug cap from the spark plug lead.
b. Connect the pocket tester (ohms x 1 k) to the spark plug cap as shown.
b. Connect the pocket tester (ohms x 1 k) to the spark plug cap as shown.

|
Pocket tester
90890-03112 Analog pocket tester YU-03112-C |
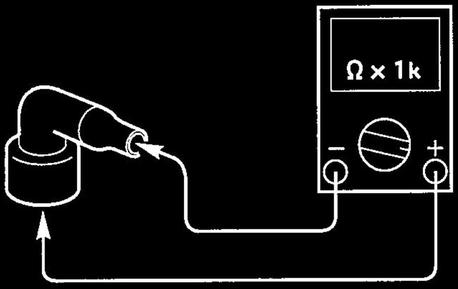
c. Measure the spark plug cap resistance.

© 2013-15 cvvmax. No animals, HDs or Ducatis were harmed in the making of this site.